こんにちはヤク学長です。
データサイエンティスト兼ファーマシストで、アルゴリズムやBI開発を行っています。
本記事の目的は、「pythonの基本操作を知る」ことを目的としています。
https://medical-science-labo.jp/pythonm04/
【本記事のもくじ】
まず、「Python」に真剣に取り組むための概要を解説します。
下記の方法で、簡単に概要を抑えることができます。
- 1.サンプル概要
- 2.実際に作成してみよう
それでは、上から順番に見ていきます。
なお、本上記の方法を抑えれば成果が出ます。
記事の内容は「転載 & 引用OK」問題ありません。
1.サンプル概要
MVCモデルに沿って作成してみよう
MVCモデルは、Model-View-Controllerの略で、ウェブ開発などのソフトウェア開発において、アプリケーションの構造化とコンポーネント化を促進するためのデザインパターンの一つです。MVCモデルでは、アプリケーションは、データを処理するModel、ユーザーインターフェースを表示するView、およびユーザーの操作を制御するControllerに分割されます。
ウェブフレームワークは、MVCモデルを採用していることが多いです。ウェブフレームワークは、ウェブアプリケーション開発に必要な一連の機能を提供し、アプリケーションの構造化と開発の生産性を高めます。具体的には、ルーティング、ビューテンプレート、データモデリング、セキュリティなどの機能を提供することがあります。代表的なウェブフレームワークには、Django、Ruby on Rails、Laravel、Spring Frameworkなどがあります。
具体的なMVCモデルの例を挙げると、ウェブアプリケーションにおける以下のような役割分担があります。
- Model: データベースやファイル、APIなどからデータを取得し、必要に応じて加工してコントローラーに渡す。
- View: ユーザーがブラウザで見ることができるHTML、CSS、JavaScriptのページを生成する。
- Controller: ユーザーからのリクエストを受け取り、適切なModelを呼び出してデータを取得し、Viewを呼び出してページを生成し、ユーザーに返す。
このフレームワークを作成していきます。
サンプルコードの完成品
下記の画像ようにチャットボットのようなものを作ってみましょう。

今回は簡単なものなので、慣れてきたらこれを改造してチャットボットなどを作成してみるのはいかがでしょうか。
2.実際に作成してみよう
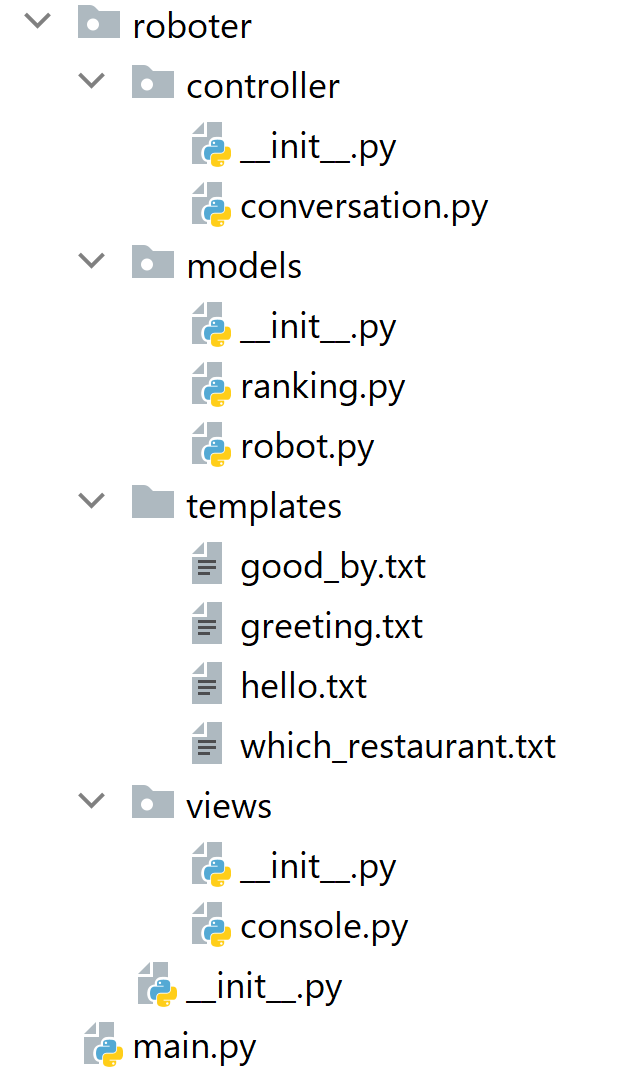
主に作成する階層イメージを記します。下記のように作成して配置してみましょう。

①main.pyの作成
【手順】
- ①main.pyファイルを作成する
- ②作成したPythonファイルに下記コードを記述する
import roboter.controller.conversation
roboter.controller.conversation.talk_about_restaurant()
【補足】
Pythonのmain.pyファイルは、Pythonスクリプトやアプリケーションのエントリーポイントとして使用されることがあります。
具体的には、main.pyファイルには、アプリケーションの開始ポイントとして実行される関数やコードが含まれます。
main.pyファイルは、Pythonプロジェクトにおいて特に明示的に定義する必要はありません。ただし、大規模なプロジェクトでは、複数のPythonファイルが存在することが一般的であり、その中のどのファイルがエントリーポイントであるかを明確にするために、main.pyファイルを使用することがあります。
main.pyファイルは、Pythonの標準ライブラリや外部ライブラリをインポートし、それらのライブラリを使用してアプリケーションを構築することができます。また、main.pyファイルは、コマンドライン引数を解析し、アプリケーションの実行時に様々なオプションを設定することもできます。
【解説】
import roboter.controller.conversation
roboter.controller.conversation.talk_about_restaurant()
このコードは、roboter.controller.conversationからtalk_about_restaurant()関数をインポートしています。そして、その関数を呼び出しています。
つまり、ロボットと会話するためのコントローラーであるtalk_about_restaurant()関数が呼び出され、ロボットが挨拶し、レストランをおすすめし、ユーザーに好きなレストランを尋ね、感謝の意を示す会話が実行されます。
【コメント】
サンプルコードの解説です。ロボットというフォルダーに、コントローラー、モデル、テンプレート、およびビューのフォルダーがあります。ビューは、テンプレートを使用して生成される見た目に関する部分を扱います。
モデルは、ロボットが行うタスクに関する情報が含まれており、ランキングモデルには、CSVファイルに関するモデルが含まれます。カンバセーションファイルには、プログラムの作成の流れが書かれており、コントローラーファイルには、カンバセーションファイルで定義された流れを実際に実行するコードが含まれています。
②Controllerの作成
【手順】
- ①Controllerのフォルダを作成
- ②作成したフォルダに__init__.pyファイルとconversation.pyファイルを作成する
- ③__init__.pyファイルは何も記述しなくてOK
- ④conversation.pyファイルを作成するに下記コードを記述する
"""Controller for speaking with robot"""
from roboter.models import robot


def talk_about_restaurant():
"""Function to speak with robot"""
restaurant_robot = robot.RestaurantRobot()
restaurant_robot.hello()
restaurant_robot.recommend_restaurant()
restaurant_robot.ask_user_favorite()
restaurant_robot.thank_you()
【補足】
①__init__.pyとは
init.pyは、Pythonパッケージに含まれる特別なファイルで、そのパッケージがimportされたときに最初に実行されるファイルです。
このファイルは、パッケージの初期化コードを含み、通常、パッケージの中で定義されるモジュール、関数、変数、クラスなどをエクスポートします。
また、init.pyファイルは、パッケージがサブモジュールを持つ場合に、サブモジュールのimportに必要なパスを指定するためにも使用されます。
したがって、Pythonのパッケージを作成する場合には、init.pyファイルを適切に使用して、パッケージの初期化や必要な変数のエクスポートなどを行います。
【解説】
"""Controller for speaking with robot"""
from roboter.models import robot


def talk_about_restaurant():
    """Function to speak with robot"""
    restaurant_robot = robot.RestaurantRobot()
    restaurant_robot.hello()
    restaurant_robot.recommend_restaurant()
    restaurant_robot.ask_user_favorite()
    restaurant_robot.thank_you()
このコードは、ロボットと話すためのコントローラーです。roboterモデルからrobotをインポートしています。
talk_about_restaurant()は、ロボットと話すための関数で、以下のアクションを実行します。
- RestaurantRobot()を使って、レストランロボットを作成します。
- hello()関数でロボットに挨拶をします。
- recommend_restaurant()関数で、ロボットがレストランをおすすめします。
- askuser_favorite()関数で、ユーザーに好きなレストランを尋ねます。
- thank_you()関数で、ロボットがユーザーに感謝の意を示します。
【コメント】
前項で、main.pyでパッケージをインポートするためんの手順を行いました。そのパッケージには、レストランに関することを話す関数が含まれています。「Ctel+B」を押すことでレストランの詳細なコードが書かれている箇所に飛ぶことができます。すると、今回作成したControllerのconversation.pyファイルに移動します。
私たちは、ここでロボットにいろいろな指示を出します。そして、このロボットの中身を操作するためにmodelsのrobot.pyというファイルを作成します。
③modelsの作成
【手順】
- ①modelsのフォルダを作成
- ②作成したフォルダに__init__.pyファイルとranking.pyファイルとrobot.pyファイルを作成する
- ③__init__.pyファイルは何も記述しなくてOK
- ④ranking.pyファイルに下記コードを記述する
"""Generates ranking model to write to CSV

"""
import collections
import csv
import os
import pathlib


RANKING_COLUMN_NAME = 'NAME'
RANKING_COLUMN_COUNT = 'COUNT'
RANKING_CSV_FILE_PATH = 'ranking.csv'


class CsvModel(object):
"""Base csv model."""
 def __init__(self, csv_file):
self.csv_file = csv_file
if not os.path.exists(csv_file):
pathlib.Path(csv_file).touch()


class RankingModel(CsvModel):
"""Definition of class that generates ranking model to write to CSV"""
 def __init__(self, csv_file=None, *args, **kwargs):
if not csv_file:
csv_file = self.get_csv_file_path()
super().__init__(csv_file, *args, **kwargs)
self.column = [RANKING_COLUMN_NAME, RANKING_COLUMN_COUNT]
self.data = collections.defaultdict(int)
self.load_data()

def get_csv_file_path(self):
"""Set csv file path.

 Use csv path if set in settings, otherwise use default
 """
 csv_file_path = None
 try:
import settings
if settings.CSV_FILE_PATH:
csv_file_path = settings.CSV_FILE_PATH
except ImportError:
pass

 if not csv_file_path:
csv_file_path = RANKING_CSV_FILE_PATH
return csv_file_path

def load_data(self):
"""Load csv data.

 Returns:
 dict: Returns ranking data of dict type.
 """
 with open(self.csv_file, 'r+') as csv_file:
reader = csv.DictReader(csv_file)
for row in reader:
self.data[row[RANKING_COLUMN_NAME]] = int(
row[RANKING_COLUMN_COUNT])
return self.data

def save(self):
"""Save data to csv file."""
 with open(self.csv_file, 'w+') as csv_file:
writer = csv.DictWriter(csv_file, fieldnames=self.column)
writer.writeheader()

for name, count in self.data.items():
writer.writerow({
RANKING_COLUMN_NAME: name,
RANKING_COLUMN_COUNT: count
})

def get_most_popular(self, not_list=None):
"""Fetch the data of the top most ranking.

 Args:
 not_list (list): Excludes the name on the list.

 Returns:
 str: Returns the data of the top most ranking
 """
 if not_list is None:
not_list = []

if not self.data:
return None

 sorted_data = sorted(self.data, key=self.data.get, reverse=True)
for name in sorted_data:
if name in not_list:
continue
 return name

def increment(self, name):
"""Increase rank for the give name."""
 self.data[name.title()] += 1
 self.save()
- ⑤robot.pyファイルに下記コードを記述する
"""Defined a robot model """
from roboter.models import ranking
from roboter.views import console


DEFAULT_ROBOT_NAME = 'Roboko'


class Robot(object):
    """Base model for Robot."""

    def __init__(self, name=DEFAULT_ROBOT_NAME, user_name='',
                 speak_color='green'):
        self.name = name
        self.user_name = user_name
        self.speak_color = speak_color

    def hello(self):
        """Returns words to the user that the robot speaks at the beginning."""
        while True:
            template = console.get_template('hello.txt', self.speak_color)
            user_name = input(template.substitute({
                'robot_name': self.name}))

            if user_name:
                self.user_name = user_name.title()
                break


class RestaurantRobot(Robot):
    """Handle data model on restaurant."""

    def __init__(self, name=DEFAULT_ROBOT_NAME):
        super().__init__(name=name)
        self.ranking_model = ranking.RankingModel()

    def _hello_decorator(func):
        """Decorator to say a greeting if you are not greeting the user."""
        def wrapper(self):
            if not self.user_name:
                self.hello()
            return func(self)
        return wrapper

    @_hello_decorator
    def recommend_restaurant(self):
        """Show restaurant recommended restaurant to the user."""
        new_recommend_restaurant = self.ranking_model.get_most_popular()
        if not new_recommend_restaurant:
            return None

        will_recommend_restaurants = [new_recommend_restaurant]
        while True:
            template = console.get_template('greeting.txt', self.speak_color)
            is_yes = input(template.substitute({
                'robot_name': self.name,
                'user_name': self.user_name,
                'restaurant': new_recommend_restaurant
            }))

            if is_yes.lower() == 'y' or is_yes.lower() == 'yes':
                break

            if is_yes.lower() == 'n' or is_yes.lower() == 'no':
                new_recommend_restaurant = self.ranking_model.get_most_popular(
                    not_list=will_recommend_restaurants)
                if not new_recommend_restaurant:
                    break
                will_recommend_restaurants.append(new_recommend_restaurant)

    @_hello_decorator
    def ask_user_favorite(self):
        """Collect favorite restaurant information from users."""
        while True:
            template = console.get_template(
                'which_restaurant.txt', self.speak_color)
            restaurant = input(template.substitute({
                'robot_name': self.name,
                'user_name': self.user_name,
            }))
            if restaurant:
                self.ranking_model.increment(restaurant)
                break

    @_hello_decorator
    def thank_you(self):
        """Show words of appreciation to users."""
        template = console.get_template('good_by.txt', self.speak_color)
        print(template.substitute({
            'robot_name': self.name,
            'user_name': self.user_name,
        }))
【解説】
④ranking.pyファイル
全体感
このコードは、ランキングを生成しCSVに書き込むモデルを生成するためのものです。CSVファイルを操作するために、CsvModelクラスを使用しています。
CsvModelクラスは、csvファイルに基づいて初期化されます。また、RankingModelクラスは、CsvModelクラスを継承し、CSVファイルにデータを書き込んだり、読み込んだりするためのメソッドを提供します。具体的には、load_dataメソッドは、CSVファイルからデータを読み込んで、dataという変数に格納します。
saveメソッドは、データをCSVファイルに書き込みます。
incrementメソッドは、指定された名前のランクを1つ増やします。
get_most_popularメソッドは、最も人気のある項目を取得しますが、not_listに含まれる項目は除外されます。また、csvファイルへのアクセスが同時に起こらないようにロックする仕組みを実装する必要があります。
個別コード解説
class CsvModel(object):
    """Base csv model."""
    def __init__(self, csv_file):
        self.csv_file = csv_file
        if not os.path.exists(csv_file):
            pathlib.Path(csv_file).touch()
このコードは、CsvModelクラスを定義しています。
このクラスは、基本的なCSVモデルを表します。init()メソッドにより、CsvModelオブジェクトが作成されたときに、csv_file属性にファイル名が格納されます。csv_fileが存在しない場合、pathlib.Path().touch()関数が呼び出され、新しい空のファイルが作成されます。
つまり、CsvModelオブジェクトが作成されると、対応するファイルが存在しない場合は新しいファイルが作成され、ファイルが存在する場合は、CsvModelオブジェクトに対応する既存のファイルにアクセスできるようになります。
class RankingModel(CsvModel):
    """Definition of class that generates ranking model to write to CSV"""
    def __init__(self, csv_file=None, *args, **kwargs):
        if not csv_file:
            csv_file = self.get_csv_file_path()
        super().__init__(csv_file, *args, **kwargs)
        self.column = [RANKING_COLUMN_NAME, RANKING_COLUMN_COUNT]
        self.data = collections.defaultdict(int)
        self.load_data()
このコードは、RankingModelクラスを定義しています。
このクラスは、CsvModelクラスを継承しており、RankingModelオブジェクトが作成されるときに、csv_file属性に指定されたCSVファイルが使用されます。csv_fileが指定されていない場合は、get_csv_file_path()メソッドを使用してデフォルトのファイルパスが取得されます。
load_data()メソッドを使用して、CSVファイルからデータを読み込み、collections.defaultdict()関数を使用して、順位をカウントするための辞書データ構造が初期化されます。ランキング情報は、2つのカラムから構成され、1つ目のカラムは「ランキングの名前」、2つ目のカラムは「ランキングの数」を示すため、self.columnにはこれらのカラム名が格納されます。
補足:*args と **kwargs
*argsと**kwargsは Python で関数定義できる特殊なパラメーターで、可変長の引数を関数に渡すことができます。*argsは可変長の位置引数を関数に渡すために使用され、関数に渡された位置引数はタプルとして*argsにまとめられます。**kwargsは可変長のキーワード引数を関数に渡すために使用され、関数に渡されたキーワード引数は辞書として**kwargsにまとめられます。**kwargsはキーワード引数のみを受け付け、位置引数を受け取ることはできません。
def get_csv_file_path(self):
    """Set csv file path.

    Use csv path if set in settings, otherwise use default
    """
    csv_file_path = None
    try:
        import settings
        if settings.CSV_FILE_PATH:
            csv_file_path = settings.CSV_FILE_PATH
    except ImportError:
        pass

    if not csv_file_path:
        csv_file_path = RANKING_CSV_FILE_PATH
    return csv_file_path
このコードは、get_csv_file_path()メソッドを定義しています。
このメソッドは、csv_file_pathを返します。settings.pyファイルにCSVファイルのパスが設定されている場合は、そのパスを返し、設定されていない場合は、RANKING_CSV_FILE_PATHを返します。設定ファイルが存在しない場合、エラーは発生しません。
try:
try は、Pythonの例外処理構文の一部で、例外が発生する可能性のあるコードを囲んでいます。try ブロック内のコードが実行されると、例外が発生する可能性があります。例外が発生した場合、Pythonはその例外を except ブロックに渡し、適切な処理を行います。
def load_data(self):
    """Load csv data.

    Returns:
        dict: Returns ranking data of dict type.
    """
    with open(self.csv_file, 'r+') as csv_file:
        reader = csv.DictReader(csv_file)
        for row in reader:
            self.data[row[RANKING_COLUMN_NAME]] = int(
                row[RANKING_COLUMN_COUNT])
    return self.data
このコードは、load_data()メソッドを定義しています。
このメソッドは、CSVファイルからランキングデータを読み込み、辞書形式で返します。CSVファイルは、self.csv_fileで指定されたパスにあります。CSVファイルから読み込んだデータをself.dataに保存し、それを返します。このメソッドは、インスタンス化した直後に自動的に呼び出され、self.dataにデータをロードします。
def save(self):
    """Save data to csv file."""
    with open(self.csv_file, 'w+') as csv_file:
        writer = csv.DictWriter(csv_file, fieldnames=self.column)
        writer.writeheader()

        for name, count in self.data.items():
            writer.writerow({
                RANKING_COLUMN_NAME: name,
                RANKING_COLUMN_COUNT: count
            })
この関数は、ランキングモデルのデータをCSVファイルに保存するためのものです。ランキングモデルは、辞書形式でデータを保持しているため、この関数では、CSVファイルに辞書のキーと値を列として書き込みます。csv.DictWriterを使って、CSVファイルに行を書き込んでいます。最初にヘッダー行を書き込み、その後、データの行を1つずつ書き込んでいます。ファイルが存在しない場合は、自動的に作成されます。
def get_most_popular(self, not_list=None):
    """Fetch the data of the top most ranking.

    Args:
        not_list (list): Excludes the name on the list.

    Returns:
        str: Returns the data of the top most ranking
    """
    if not_list is None:
        not_list = []

    if not self.data:
        return None

    sorted_data = sorted(self.data, key=self.data.get, reverse=True)
    for name in sorted_data:
        if name in not_list:
            continue
        return name
この関数は、not_listに含まれない、ランキングのトップデータを返します。 not_listに含まれる場合は、スキップします。もしランキングが存在しない場合、 Noneを返します。not_listがNoneの場合、空のリストがセットされます。
def increment(self, name):
    """Increase rank for the give name."""
    self.data[name.title()] += 1
    self.save()
この関数は、与えられた名前のランクを1つ増やします。ランキングモデルの内部変数dataにある名前をキーとし、その名前のランクを値として表します。この関数は、指定された名前をキーとして、ランクを1つ増やし、ランキングモデルのdata変数を更新し、save関数を呼び出して変更内容をCSVファイルに保存します。
④robot.pyファイル
全体感
ロボットモデルを定義しています。
このコードは、レストランに関する情報を扱うためのRestaurantRobotというクラスを定義しています。
Robotクラスを継承しており、名前やユーザー名、話す色などの属性を持っています。また、hello、recommend_restaurant、ask_user_favorite、thank_youの4つのメソッドがあります。
helloメソッドは、ユーザーに挨拶をし、ユーザー名を収集します。
recommend_restaurantメソッドは、ランキング情報を使用してユーザーにレストランを勧めます。ask_user_favoriteメソッドは、ユーザーに好きなレストランに関する情報を収集します。
thank_youメソッドは、ユーザーに感謝の言葉を表示します。また、_hello_decoratorというデコレータが定義されており、それぞれのメソッドに対して、ユーザーが挨拶をしていない場合には、helloメソッドを呼び出します。
詳細コード解説
def __init__(self, name=DEFAULT_ROBOT_NAME, user_name='',
             speak_color='green'):
    self.name = name
    self.user_name = user_name
    self.speak_color = speak_color
このコードは、Pythonのクラス定義の中で、初期化メソッド(init)を定義しています。
引数として、name、user_name、speak_colorの3つの値を受け取ります。これらは、オブジェクトの属性として保存されます。
nameは、ロボットの名前を表します。もし引数が渡されなかった場合、DEFAULT_ROBOT_NAMEという定数で指定された名前がデフォルト値として使用されます。
user_nameは、ロボットを使うユーザーの名前を表します。引数が渡されなかった場合は、空の文字列がデフォルト値として使用されます。
speak_colorは、ロボットが話すときに使用する色を表します。引数が渡されなかった場合は、緑色がデフォルト値として使用されます。
このように、__init__メソッドは、オブジェクトが作成されるときに、初期化を行うために使用されます。引数を受け取り、オブジェクトの属性を設定します。
def hello(self):
    """Returns words to the user that the robot speaks at the beginning."""
    while True:
        template = console.get_template('hello.txt', self.speak_color)
        user_name = input(template.substitute({
            'robot_name': self.name}))

        if user_name:
            self.user_name = user_name.title()
            break
このコードは、ロボットが挨拶するためのhello()メソッドを定義しています。
このメソッドは、ユーザーからの入力を受け付けます。最初に、hello.txtという名前のテンプレートを使用して、ロボットが話す内容を表示します。このテンプレートには、ロボットの名前(self.name)が含まれます。また、ロボットの話す色(self.speak_color)もテンプレートに渡されます。
ユーザーが入力した名前は、self.user_nameに格納され、最初の文字が大文字に変換されます。入力があった場合は、whileループから抜けます。
なお、このコードでは、whileループが無限ループとなっています。つまり、ユーザーが何らかの入力を行うまで、このループは続きます。ただし、if文のbreak文が実行された場合は、ループから抜けることができます。
def __init__(self, name=DEFAULT_ROBOT_NAME):
    super().__init__(name=name)
    self.ranking_model = ranking.RankingModel()
このコードは、Pythonのクラス定義の中で、初期化メソッド(init)を定義しています。
このクラスは、他のクラス(親クラス)を継承しているため、super()を使用して親クラスの初期化メソッドを呼び出します。name引数は、親クラスの初期化メソッドに渡されます。
その後、self.ranking_modelという属性が追加され、ranking.RankingModel()というクラスのインスタンスが代入されます。これは、rankingモジュール内のRankingModelクラスのインスタンスを生成しています。
つまり、このコードは、親クラスの初期化と同時に、ランキングを計算するためのランキングモデルを作成し、self.ranking_model属性に格納することを目的としています。
def _hello_decorator(func):
    """Decorator to say a greeting if you are not greeting the user."""
    def wrapper(self):
        if not self.user_name:
            self.hello()
        return func(self)
    return wrapper
このコードは、_hello_decoratorというデコレータを定義しています。デコレータは、関数やメソッドを修飾し、機能を追加するために使用されます。
このデコレータは、引数として関数を受け取り、内部で別の関数(wrapper)を定義しています。wrapper関数は、デコレータが適用された関数(func)を実行する前に、ユーザーに挨拶をするためのhello()メソッドを呼び出します。
具体的には、wrapper関数は、ロボットがユーザーに挨拶していない場合、hello()メソッドを呼び出します。そして、元の関数(func)を呼び出し、その結果を返します。
つまり、このデコレータは、クラスのメソッドが実行される前に、ユーザーに挨拶するための処理を自動的に追加することができます。これにより、クラスの実装をより簡潔にし、可読性を高めることができます。
@_hello_decorator
def recommend_restaurant(self):
    """Show restaurant recommended restaurant to the user."""
    new_recommend_restaurant = self.ranking_model.get_most_popular()
    if not new_recommend_restaurant:
        return None

    will_recommend_restaurants = [new_recommend_restaurant]
    while True:
        template = console.get_template('greeting.txt', self.speak_color)
        is_yes = input(template.substitute({
            'robot_name': self.name,
            'user_name': self.user_name,
            'restaurant': new_recommend_restaurant
        }))

        if is_yes.lower() == 'y' or is_yes.lower() == 'yes':
            break

        if is_yes.lower() == 'n' or is_yes.lower() == 'no':
            new_recommend_restaurant = self.ranking_model.get_most_popular(
                not_list=will_recommend_restaurants)
            if not new_recommend_restaurant:
                break
            will_recommend_restaurants.append(new_recommend_restaurant)
このコードは、recommend_restaurant()メソッドに _hello_decorator デコレータが適用されていることを示しています。
このメソッドは、ランキングモデルを使って、ユーザーにおすすめのレストランを表示するためのものです。新しいおすすめレストランが取得され、ユーザーに問い合わせます。ユーザーがレストランを受け入れる場合は、ループを終了し、レストランを返します。ユーザーがレストランを拒否する場合は、別のおすすめレストランを取得し、再びユーザーに提示します。これは、新しいレストランがリストに含まれていないようにするために、受け入れられなかったレストランをリストに追加する必要があります。
_hello_decoratorデコレータが適用されることで、recommend_restaurant()メソッドが呼び出された場合には、まず_hello_decorator()関数が呼び出され、ユーザーに挨拶をする処理が実行されます。その後、recommend_restaurant()メソッドが実行されます。つまり、このデコレータにより、recommend_restaurant()メソッドの実行前に挨拶が自動的に行われるようになります。
@_hello_decorator
def ask_user_favorite(self):
    """Collect favorite restaurant information from users."""
    while True:
        template = console.get_template(
            'which_restaurant.txt', self.speak_color)
        restaurant = input(template.substitute({
            'robot_name': self.name,
            'user_name': self.user_name,
        }))
        if restaurant:
            self.ranking_model.increment(restaurant)
            break
このコードは、ask_user_favorite()メソッドに_hello_decorator()デコレータが適用されていることを示しています。
このメソッドは、ユーザーに好きなレストランを尋ねて、ランキングモデルにそれを追加するためのものです。ユーザーがレストランを入力すると、ランキングモデルがインクリメントされ、ループが終了します。
_hello_decoratorデコレータが適用されることで、ask_user_favorite()メソッドが呼び出された場合には、まず_hello_decorator()関数が呼び出され、ユーザーに挨拶をする処理が実行されます。その後、ask_user_favorite()メソッドが実行されます。つまり、このデコレータにより、ask_user_favorite()メソッドの実行前に挨拶が自動的に行われるようになります。
@_hello_decorator
def thank_you(self):
    """Show words of appreciation to users."""
    template = console.get_template('good_by.txt', self.speak_color)
    print(template.substitute({
        'robot_name': self.name,
        'user_name': self.user_name,
    }))
このコードは、thank_you()メソッドに_hello_decorator()デコレータが適用されていることを示しています。
このメソッドは、ユーザーに対して感謝の気持ちを伝えるためのものです。デコレータにより、thank_you()メソッドが呼び出される前に挨拶が自動的に行われるようになります。
具体的には、_hello_decorator()関数が呼び出され、ユーザーに挨拶が行われた後、thank_you()メソッドが実行されます。thank_you()メソッドでは、console.get_template()関数によって、指定されたテンプレートを使って感謝のメッセージが出力されます。
【コメント】
modelsのrobot.pyの中身を見てみましょう。ここには、Robotの基本クラスがあり、RestaurantRobotというclassが継承されています。他の種類のロボットが追加される可能性があるため、基本的なRobotはここに書かれています。このRestaurantRobotには、@_hello_decoratorという挨拶するという機能があります。この「hello」という関数は、基本クラスに書かれているものであり、他の関数はレストランロボットに書かれています。
最初に「hello」という関数を呼び出すと、console.get_templateでコンソールから「get_template」という関数が呼び出されます。これは、ユーザーに返すテンプレートを取得するためのものです。なので、get_templateを見に行くという流れです。
まずはざっくりと、コードを読むときには、細かいところにこだわるよりも、全体像を理解することを重視しましょう。
続いて、recommend_restaurantに移ります。この中を見るとranking_modelを使用して処理しています。
ranking_modelに関しては、CSVモデルを継承しており、CSVファイルからデータを読み込んでいます。ranking_modelを作成する際には、CSVファイルのパスを取得する必要があります。ranking_modelは、基本的なクラスであり、他のデータベースと同様に扱うことができます。ranking_model内で、collections.defaultdictを使用してデータを読み込んでいます。
robot.pyに戻ります。レコメンドされたレストランに戻ります。ASKUSERFAVORITEに行くと、テンプレートに沿って出力を返し、ユーザーからの入力を待ちます。ユーザーがレストランの名前を入力すると、ランキングに加えて、タイトルに名前が追加されます。これにより、レストランのリストを作成し、ランキングのインクリメントを確認できます。
次に、ENTERを押すと、サンキューのメッセージが印刷されます。そして、次のレコメンドされたレストランが表示されます。
例えば、私が名前と入力した場合、前回入力したレストランが返されます。ユーザーがレストランを気に入った場合、IF文が次の行に進みます。そして、このレストランをリストに追加し、次のゲストが来た時に呼び出すことができます。また、ユーザーに「このレストランが好きですか?」と尋ねるテンプレートがあります。ユーザーが「イエス」と答えた場合、プログラムは終了します。ユーザーが「ノー」と答えた場合、プログラムは再度ポピュラーなレストランを提案します。ただし、一番初めに尋ねたレストランは除外されます。ビルレコメンドレストランを使用して、ランキングとリストを更新します。」
ありがとうございます。コードの可読性を高めることは、他の人があなたのコードを読みやすくするだけでなく、将来的にあなた自身がコードを再訪する場合にも役立ちます。
③viewsの作成
【手順】
- ①viewsのフォルダを作成
- ②作成したフォルダに__init__.pyファイルとconsole.pyファイルを作成する
- ③__init__.pyファイルは何も記述しなくてOK
- ④console.pyファイルに下記コードを記述する
"""Utils to display to be returned to the user on the console."""
import os
import string

import termcolor


def get_template_dir_path():
    """Return the path of the template's directory.

    Returns:
        str: The template dir path.
    """
    template_dir_path = None
    try:
        import settings
        if settings.TEMPLATE_PATH:
            template_dir_path = settings.TEMPLATE_PATH
    except ImportError:
        pass

    if not template_dir_path:
        base_dir = os.path.dirname(os.path.dirname(os.path.abspath(__file__)))
        template_dir_path = os.path.join(base_dir, 'templates')

    return template_dir_path


class NoTemplateError(Exception):
    """No Template Error"""


def find_template(temp_file):
    """Find for template file in the given location.

    Returns:
        str: The template file path

    Raises:
        NoTemplateError: If the file does not exists.
    """
    template_dir_path = get_template_dir_path()
    temp_file_path = os.path.join(template_dir_path, temp_file)
    if not os.path.exists(temp_file_path):
        raise NoTemplateError('Could not find {}'.format(temp_file))
    return temp_file_path


def get_template(template_file_path, color=None):
    """Return the path of the template.

    Args:
        template_file_path (str): The template file path
        color: (str): Color formatting for output in terminal
            See in more details: https://pypi.python.org/pypi/termcolor

    Returns:
        string.Template: Return templates with characters in templates.
    """
    template = find_template(template_file_path)
    with open(template, 'r', encoding='utf-8') as template_file:
        contents = template_file.read()
        contents = contents.rstrip(os.linesep)
        contents = '{splitter}{sep}{contents}{sep}{splitter}{sep}'.format(
            contents=contents, splitter="=" * 60, sep=os.linesep)
        contents = termcolor.colored(contents, color)
        return string.Template(contents)
【解説】
全体感
このコードは、コンソールに表示するためのユーティリティを提供するためのものです。主な関数は以下の通りです。
- get_template_dir_path: テンプレートのディレクトリパスを取得する関数。
- find_template: 指定された場所でテンプレートファイルを検索し、そのファイルパスを返す関数。
- get_template: テンプレートファイルのパスを指定し、そのテンプレートを読み込んで、色の設定を適用した上で返す関数。
また、NoTemplateErrorという例外クラスも定義されており、テンプレートが見つからない場合に送出されます。また、termcolorというライブラリを使用して、テンプレートの表示に色をつけることができます。
詳細コード解説
def get_template_dir_path():
    """Return the path of the template's directory.

    Returns:
        str: The template dir path.
    """
    template_dir_path = None
    try:
        import settings
        if settings.TEMPLATE_PATH:
            template_dir_path = settings.TEMPLATE_PATH
    except ImportError:
        pass

    if not template_dir_path:
        base_dir = os.path.dirname(os.path.dirname(os.path.abspath(__file__)))
        template_dir_path = os.path.join(base_dir, 'templates')

    return template_dir_path
この関数は、テンプレートのディレクトリのパスを取得するためのものです。
まず、settingsモジュールをインポートし、TEMPLATE_PATH変数が設定されている場合は、その値をtemplate_dir_pathに設定します。settingsモジュールがインポートできなかった場合は、何もしません。
もしtemplate_dir_pathがNoneの場合は、__file__から2つ上のディレクトリのパスを取得し、’templates’という名前のディレクトリを指定して、template_dir_pathに設定します。
最終的に、template_dir_pathを返します。
class NoTemplateError(Exception):
    """No Template Error"""


def find_template(temp_file):
    """Find for template file in the given location.

    Returns:
        str: The template file path

    Raises:
        NoTemplateError: If the file does not exists.
    """
    template_dir_path = get_template_dir_path()
    temp_file_path = os.path.join(template_dir_path, temp_file)
    if not os.path.exists(temp_file_path):
        raise NoTemplateError('Could not find {}'.format(temp_file))
    return temp_file_path
このコードは、指定された場所にあるテンプレートファイルを検索するためのものです。
まず、get_template_dir_path()関数を呼び出して、テンプレートファイルが保存されているディレクトリのパスを取得します。次に、os.path.join()関数を使用して、指定されたファイル名とディレクトリパスを結合し、temp_file_pathという変数に保存します。
そして、もしtemp_file_pathが存在しない場合は、NoTemplateErrorという例外を送出します。これは自作の例外で、ファイルが見つからない場合に発生するように設計されています。例外が発生しない場合は、temp_file_pathを返します。
def get_template(template_file_path, color=None):
    """Return the path of the template.

    Args:
        template_file_path (str): The template file path
        color: (str): Color formatting for output in terminal
            See in more details: https://pypi.python.org/pypi/termcolor

    Returns:
        string.Template: Return templates with characters in templates.
    """
    template = find_template(template_file_path)
    with open(template, 'r', encoding='utf-8') as template_file:
        contents = template_file.read()
        contents = contents.rstrip(os.linesep)
        contents = '{splitter}{sep}{contents}{sep}{splitter}{sep}'.format(
            contents=contents, splitter="=" * 60, sep=os.linesep)
        contents = termcolor.colored(contents, color)
        return string.Template(contents)
この関数は、指定されたテンプレートファイルの内容を取得し、カラー設定を適用してstring.Templateオブジェクトを返すためのものです。
まず、find_template()関数を呼び出して、テンプレートファイルのパスを取得します。次に、open()関数を使用して、テンプレートファイルを開き、ファイルの内容をcontents変数に読み込みます。rstrip()関数を使用して、行末の改行文字を取り除きます。
contents変数に、ヘッダーとフッターの区切り線、およびテンプレートファイルの内容を含む文字列を作成します。そして、termcolor.colored()関数を使用して、カラー設定を適用し、string.Templateオブジェクトとして返します。color引数がNoneの場合は、カラー設定を適用しません。
【コメント】
コードを見ると、ざっと何をしているかが分かります。
get_template_dir_path:でテンプレートのディレクトリパスを取得する関数を使ってい、find_templateで指定された場所でテンプレートファイルを検索し、そのファイルパスを返す関数を使っています。その後、get_templateで返す関数を使っていますね。
まず初めに「get_template」というもので、テンプレートファイルのパスを指定します。次の項目で「hello.txt」を作成するのでこのテキストが該当されます。続いて、template = find_template(template_file_path)でテンプレートを探しに行きます。
template_dir_path = get_template_dir_path()を見ると、ディレクトリの場所がわからないため、「get_template_dir_path」にアクセスして指定する必要があるんだなとわかります。
「get_template_dir_path」ディレクトリパスを探しにいきます。ざっとみると、import settingsif settings.TEMPLATE_PATH:と書いてありますね。インポート設定がある場合は設定スロットのテンプレートパスを指定し、そうでなければ、base.dirを指定するという流れです。プログラムを書く際には、テンプレートのパスを注意深く扱ってください。
④templatesの作成
【手順】
- ①templatesのフォルダを作成
- ②作成したフォルダにgood_by.txtとgreeting.txtとhello.txtとwhich_restaurant.txtを作成する
- ③good_by.txtに下記コードを記述する
$robot_name: $user_nameさん。ありがとうございました。

良い一日を!さようなら。
- ④greeting.txtに下記コードを記述する
私のオススメのレストランは、$restaurantです。

このレストランは好きですか? [Yes/No]
- ⑤greeting.txtに下記コードを記述する
こんにちは!私は$robot_nameです。あなたの名前は何ですか?
- ⑥which_restaurant.txtに下記コードを記述する
$user_nameさん。どこのレストランが好きですか?
以上が簡単なチャットボットアプリです。
というわけで、今回は以上です。大変大変お疲れ様でした。
もし、上手くいかない場合はご連絡ください。
引き続きで、徐々に発信していきます。
コメントや感想を受け付けています。ちょっとした感想でもいいので嬉しいです。
それでは、以上です。


